CLICK HERE FOR FREE BLOGGER TEMPLATES, LINK BUTTONS AND MORE! »

Sunday, October 31, 2010

Apothecary Jars

When hubby and I got married in 2007, we had puchased everything. We/I did our/my best to keep it on the cheap. This had included purchasing vases from the dollar section at Target. (Don't you love finding stuff in that little section?!) Since our wedding we have had  ALL of those vases (I think 16 or so) boxed up in the basement. After a wedding you are too wiped out to go through everything and to be quite honest I never got to it.

See my "Boo and EEK" blocks?!

 So I have brought some up slowly. All these blogs have inspired me - SOOO much!! House of Hepworth's had just what I needed. Althought I had to make a trip to the dollar store to get two candlesticks, but it was well worth it. With all my gear in front of me I'm ready! I added a bead of hot glue on to the candle stick and ...
Love it! The marbles were from the wedding also. I need to keep them close by since I seem to loose mine often. They look great with my "Boo" and "EEK" blocks! This was so easy it wasn't even funny. I love quick and easy projects!

And I got this pulled together on no other day than Halloween. Couldn't have gotten this done earlier to enjoy it longer right? I'm thinking of winter stuff now though and that will look great with these too. Happy Halloween out there! Be safe while taking your kiddies trick or treating.

Wednesday, October 27, 2010

BOO!! EEEeeeekkk!!


There needed to be some Halloween decorations inside. This is not typical for me to do. I wanted it to be cheap and easy. Hubby decorates the outdoors...I do mean decorate! I had him cut some squares out of wood for me. Then modge podged some scrapbook paper on the six sides of six cubes. Used my Cricut to cut out BOO and EEK. I had white paper that was used at test paper and those turned out to be the letters I had actually used. With an ink pad it went around the edges of all the letters to age them. Then modge podged those on to the cubes. There was one side I had done in orange that I had put the EEK on. I had taken the ink pad to the edges of that to give it an aged look as well. Ta da!! Bought a silver skull at the dollar store. (I was gonna get black, but the time it took for me to make up my mind while walking the store someone else took them.)
The candles in the above picture are flameless candles, which will be turned on at night. Happy Spooking!!

Tuesday, October 26, 2010

The best Chocolate Chip cookies!!

This weather is perfect for baking. Makes you just want to cozy up with the softest blanket ever and eat a freshly made chocolate chip cookie! Hmmm.Until recently I have always used the recipe on the back of that bag. Yes, that yellow bag - you know the one. Secretly though I have longed to find a better recipe. One that would make a big 'ol fat cookie. Like the size of my head. Well, not really. I came across the best recipe for chocolate chip cookies. Somone had asked me where I had bought them because they looked just that good! You will have to try these just once. And if you want to mix it up a bit more add some frosting and sandwich the two of them together. I did this when I was alone. I felt guilty for such an indulgence. It was not just ANY frost, but it was a cream cheese frosting. Oh, it was yummy! Be sure to stop over at How Does She to get the recipe. Bobbi Jo does a wonderful job of romancing the cookie.

They also have a groupon deal through the end of the day on Jamberry Nails. Have you heard of them? I never had until I had seen them on How Does She. Check it out! Fun little way to have professional looking nails for a fraction of salon cost. Hmmm...now what pattern do I want??
http://www.facebook.com/l.php?u=http%3A%2F%2Fwww.howdoesshe.com%2Fjamberry-nails-with-groopdealz&h=16773

Monday, October 25, 2010

Taco Cups

Ahhh ... and the little ones are down. Just in time for me to prep dinner. That is the most fantastic feeling. Well, one of many I should say. It gives a sense of Mission Accomplished! This evening is one of my many simple meals. Keeping it simple is the best. If a recipe has too many ingredients I tend to pass right by it. In less of course hubby would like it or I know that it would be a total winner with - like say Cheesecake Factory Cheesecake. (I found that recipe online and am going to be making it within the next week!!) This is a fun one to do with the kids. That and the fact that they can have their own special little taco cup is a bonus.


Taco Cups
1 can of wampum biscuits - you know those biscuits in the can that you have to wamp open!
1 lb of hamburger meat or meat of choice
1 package of taco seasoning
1/2 c cheddar cheese

Preheat oven to 400 degrees. Cook the hamburger according to the taco seasoning directions. In a muffin pan, place one biscuit in each cup and for to cup. Fill each cup with taco mixture, then back for 10 minutes. Remove and add cheese to tops and place back into the ove for another 2 to 3 minutes.

** Bonus - add black beans to the hamburger when adding taco spices. I always buy about 2 lbs of hamburger and divide it up into thirds when I bring it home from the store. So my pound of hamburger that goes into recipes is less than a pound. To make up for it in this recipe I am adding a can of black beans to it. We get the fiber and additional benefits from the beans and no one knows the wiser. Shhhhh... its a secret!

Salsa Rice
2c cooked rice
1/2 c salsa
1/2 c cheddar cheese

Cook rice according to directions. Add salsa and cheese to rice. Viola! I mean 'Ole!!

Friday, October 22, 2010

Bathroom Art

Hubby had recently redone the bathroom. Since then I have added a few things. There needed to be a little sign to go on a shelf that I had purchased from Target. I just knew it needed something that was sign-like, but didn't know what. Until I came across it at PB online. Holy cow that stuff is expensive. (We don't have one in our area, so I never really concerned myself with them or their prices)


I knew I could make this! It couldn't be that hard could it? And everyone else has been doing knock off t-shirts, so I thought I would take my own direction in doing a knock off a little different from everyone else. It would be perfect in the bathroom - that is the size of a closet. The deminsion that it came in not fit into else in the bathroom. Nor would it be to scale with were I wanted/needed it to go. Hubby went and cut a peice of wood for me that would be appropriate for where I wanted it to go. A little pain, a steady hand and viola!!


Here it is on the shelf from Target.


 This is art work we had made during the summer. This is on the opposing wall.


Thursday, October 21, 2010

Hair oh Hair!

Once you become a mom everything changes. If your a fellow mom you know exactly what I am talking about. If you are a stay at home mom you know may be able to relate to my whole hair issue. The whole stigma of 'your just a stay at home mom' thing. When you don't feel put together it just doesn't help how you feel about yourself. And when you have a horrible haircut it just adds insult to injury.

I had gone to a hair dresser that had botched up my hair a bit. I had told hubby that I had two different haircuts on my head. It was terrible! Well, so I thought and felt. I HATED it. I mean just hated it. Back in May we were going out of town to visit hubby's family, which happened to be the same weekend I had scheduled an appointment to get my hair cut. The trip out of town over rode the hair cut, so I canceled it. Needless to say I never rescheduled it or went back. I went months without a hair cut. This is so unusual for me. Every time I would get it cut I would make an appointment before I left. It always saved me the time and hassle of remembing to call for an appointment. Since May I had cut my bangs myself out of desperation. I had also gone to a place in the mall - one of those walk in places. Desperation was among me. Finding a new hair dresser at this point was like going to the dentist. Uggg!! What to do! We have a local publication called Family Magazine. They have a contest in there every month. You locate the acorn picture, go to their website and tell them what page you found it on. I did that! My prize?! I won $30 to a salon! Really?! Yes, really!! I was estatic. Maybe this was what I needed. I called and made an appointment. I gently explained I was unhappy with my current cut and said it was not right. It was messed up. This past Tuesday I went in to the unknown. A leep on faith if you will. She told me she was at a hair show the day before and had the perfect cut for me. A deconstructed bob. Ok, lets do it. She cut and cut and c-u-t - that ' s a l o t o f h a i r  *gulp*.
I thought it's ok. It is a new phase. Two little beautiful girls and I need something a bit new for myself. A few snip snips later and... 

Much better! Ahhh!!!

Stop over at Simply Modern Mom to enter her give away. That is one sweet giveaway - a laptop! Not only is it a sweet give away, but it is in honor of breast cancer. Dell has done a few special design in honor of the month October and Breast Cancer awareness.  

Wednesday, October 20, 2010

Autumn Harvest

I really wanted to go apple picking this fall. Unfortunately the apple picking turned out to be picking them at the store. What was important was being able to enjoy the ripe fruit of the season. The other motive was to use the fruit that was in season to make baby food. I had made some baby food for my oldest, but didnt think in advance to use what is in season to cut down on cost. Somone had suggested to a friend to make applesauce in a crockpot. Really!! You can do that? (I am an avid collector of recipe's - it's a terrible addiction.) So I searched through the recipes I had avaliable to me. The one thing I had aquired when hubby and I got married was a crockpot cookbook that he NEVER used. There it was - the recipe sitting before me like a golden ticket.

Applesauce

10 medium Winesap or Golden Delicious, cooking apples
 (I used Golden Delicious)
1/2 c. water
3/4 c sugar
cinnamon - optional

Core, peel and thinly slice apples. Combine all ingredients in slow cooker. Cover and cook on low for 5 hours. Stir until well blended.

I had used the cinnamon when I had made it. The apple sauce tasted like an apple pie minus the crust. Ohhh...it was wonderful!! Before freezing I had sent it through a small food mill.
My second batch I had used apple juice that didn't have sugar added in place of the water. I did this because I have been picky about giving my girls sugar at too young of an age. Once they were cooked I had added a couple of tablespoons to it. 

The crockpot applesauce inspired me to make homemade pumpkin puree. When we had picked up apples, I had also picked up a 'Pumpkin Pie' Pumpkin. There were directions on how to bake it in the oven, but after making the apple sauce I thought why not try the crockpot again.

I cleaned off the exterior of the pumpkin cut the stem off and cleaned out the seeds.
 Then cut it into wedges so it would fit into the crockpot. Added about 1 cup of water for steaming and cooked it until it was fork tender.
Once it was cooked I allowed it to cool, then processed with the baby foodmill. The puree was then spooned into an ice cube tray for easy portions and frozen. Once the cubes of puree are frozen they go into a freezer bag marked Pumpkin and dated.

I have been so busy with an assortment of projects! Here is a sneak peak... 


Friday, October 8, 2010

Piece of Cake!!

Its my stepson's birthday. My original thought was to make a cookie. You know, the big cookie in the pizza pan. I had planned it in my mind until I had done a little blog surfing. I love doing that!! So I took a sharp right and made a cake. Not just any other cake, but this....

So I will start from the beginning. Some basic cake chat. My mom has been making cakes since I was knee high to a grasshopper so I have learned a few things along the way. Never did aquire her artistic abilities, hence the above cake. She has done some pretty great cakes. This was made using a box mix. Dont tell anyone! Shhhh!! The directions can be a bit misleading. First it says to beat the batter for 2 minutes. Take a little more time and add a little more love to it by beating the batter for an additional few minutes. I promise .... this is the one time where beating more is good! Be sure to prepare your pans for the batter. The box mix I had said you could either use vegetable spray or grease and flour.

**Notice the paper towel behind the pan? That will go around the exterior of the pan prior to going into the oven.

 Well....here is the outcome...
The cake on the left the pan was preped using vegetable spray. Notice out it fell apart! Never again will I go that route. The one on the right the pan was prepped using the conventional method of greasing the pan and flouring. If you are using a box mix, use some of the dry mix instead of the flour to avoid white powder look. It works.
Prior to putting the pan (with cake mixture in prepared pan) pull out a bunch of paper towels.

Get them wet - well some where between damp and wet. This gets folded and wrapped around your cake pan. See how it looks like it has been folded? It was. Wrap it around the exterior of your cake pan prior to being put into the oven. This will ensure that your cake will bake evenly. Your cake wont turn out with a huge dome looking like the dome at Notre Dame.

See ... no dome! The one on the left is a perfect example. That was right out of the pan. I only make cakes like - uhhhhh a couple times a year if that. If you are like me and cant cut a straight line here is a tip that may help you in the event you do get a dome. I placed the frozen cake back into the pan and trimmed it so it was flat. Frozen?? Keeping reading and you will see why.
Bake cake according to the directions in regards to oven tempature and time. Once the cake is done baking, it goes directly into the freezer. Yes! Freezer!! Why? You will have the most moist cake and people will be asking you how you made the cake. It works. Honestly does. A bonus to this freezer technique is that you can make your cake a few days or week in advance.
While my cakes were thawing I made frosting. I always buy the store stuff. I buy two different flavors, mix them together and add flavoring. I had a friend practically beg me to tell her my recipe. This recipe I had come across while blog hopping. I tweeked it a bit to make it my own though.

Once your frosting is ready begin putting it on the cake. MMMmmmm - oh that taste good. Love some frosting! Oh you know when I said my mom made cakes when I was a kid? She made her own frosting. I would always go out to the kitchen with my finger prepped to get some of it. One time I did. It wasnt pretty. part of her frosting recipe was using Crisco. I primed my finger, dipped it in there, stuck it in the my mouth .... EWWWW! It wasnt frosting at all. It was the grease. Boy was I disappointed. I think I was suppose to learn something.
So now your cake is all frosted and should look something like this...

I did add a crumb coat to it earlier. Crumb coat is a thin coat of icing on the cake to seal the crumbs from the final coat of icing. Here though, I dont care how messy the final coat is. Notice my gear? Kit kats and reece's ready to apply. Here we gooooo..
Hmmm...see a problem? One of the cakes turned out too high from baking. Tsk tsk. I see an opportunity.
I stacked the reeces peices over the kit kats to make it appear that there is a TON gazillion of them.
Oh give me a break! I ran out of kit kats? Really? I had gotten to king size bars for this and thought it would be enough. By the way, this is a 6" cake if you need referrence. So another trip to the drug store and we got two regular size bars of kit kats for me to finish this bad boy off.
 Here is the final version .. mmmmm that frosting is soooo

And I added an "E" on top for the birthday boy's name. See it? Mmmmm...

Thank you to Texas Monkey for the idea. Check out their link for more ideas like this http://texasmonkey.blogspot.com/
Now, go eat your cake!

Friday, October 1, 2010

Time Out

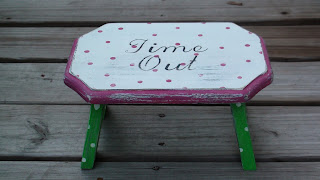
In a few months my oldest will be 2. Yes, thats right, TWO! She has already been displaying her two-isms. They sometimes start first thing in the morning. There is a spot by one of the doors that is designated just for her. At that spot she has been sitting on a doormat/rug that doesnt get used. That is being replaced by a stool! Her older brother (my stepson) had this for sometime and it was just collecting dust. What better way to put it to use than to have it as a 'Time Out' seat.
Before...
Sorry the flag is upside down. I dont mean to be disrepectful, but was not thinking about it when I took it. I think that there is something more wrong about stepping on it though.


I had begun to paint it black at first because I wasn't quite sure what colors I was going to use. The black didn't cover very well, but I still used it. Once I had gone to the store and gotten colors and white I had painted over the black. The effect turned out to be quite nice. I sanded it down a bit because there is crackle paint over it that was beginning to flake. I thought it would probably be best to get rid of some of that before going over it with new paint.
After....
Cute huh?! Erin over at Lemon Tree Creations had redone a sign. She explains how here, http://lemontreecreations.blogspot.com/2010/03/1-welcome-sign.html 
Thanks for the idea Erin! It worked out wonderfully for me.

 The dots were done using a new unused eraser on the end of a pencil. I used some sandpaper to age it a little. Hubby suggested that I age it a bit where the little butt would sit.


Love how it turned out. I hope my little G hopes using it as much as I like to look at it.